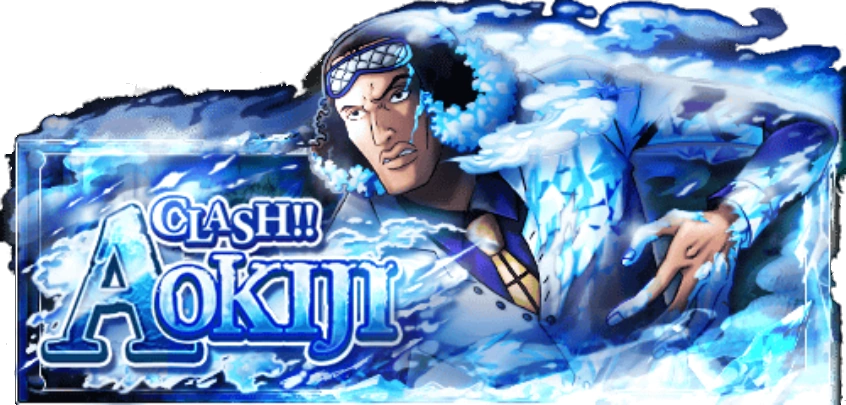
General Info[]
 | ||||||
| Quest | Boss | Difficulty | Conditions | Notable Captures/Drops | ||
|---|---|---|---|---|---|---|
 |
| |||||
  |
| |||||
| |||||
Notes[]
- 1 Rainbow Gem will be received upon first clear
- 24 hours Limited-Time Event
- You can recruit Aokiji on all difficulties.
- On 60 Stamina you will have a 100% probability of him dropping
- On 40 Stamina the official numbers are not published, but it's low. It's estimated to be a 15-30% chance of Aokiji dropping.
Tips on How to Beat Clash!! Admiral Aokiji[]
FAQs[]
General Information[]
At the time of its release on global, this became the undisputed most difficult raid boss in the game. This will surely evolve, and many report success with various teams, but unless you have 90+ units with low cooldowns (under 20), including the "gateway to advanced content" aka Donquixote Doflamingo Warlord of the Sea you can most likely forget beating Aokiji without gems.
Recommended Captains[]
- Dark King Rayleigh - not as good as LL Luffy, but he will clear this
- Eneru, Lightning Incarnate 200,000,000 Volt Amaru: He is by no mean the best lead as you'll need a MAX squad for him to work, however he is the only farmable lead that can clear this. Garp can as well but is questionable and requires some RR units to really make him solid.
- Monkey D. Luffy Voyage Dream: Pirate King or Monkey D. Luffy Gear Third
- Sengoku the Buddha - PSY legends can take down INT bosses as usual
- Shanks Black Clad Emperor
- Maelstrom Spider Squard: Makes sense as you'll pretty much have low health the first 5 rounds against Aokiji.
- Garp the Fist: Only bring Garp as a friend captain if you don't have level 1 anti-despair. He can work to win, but you'll need some RR heavy hitting units to really solidify a victory.
Recommended Support Units[]
- You will need to focus on units that boost attack for a burst round as Aokiji is immune to all effects (time delay, defense reduction, etc). You will need to deal 2 million in damage in one round. Under 50%, he immediately triggers haste and attack boost. Under 20%, he immediately triggers... well you just die honestly.
- PSY Beat Sticks: You'll want one or two of these if possible for your burst round.
- PSY Burst squad: These units will either manipulate orbs, boost attack, or orbs for your heavy hitters to finish the job.
- Garp the Fist: Foundation of burst round to give you PSY orbs and food.
- Mr. 2 Bon Clay Bombardier Arabesque: You will have to choose between Mr. 2 and Rakuyo. Mr. 2 does a full PSY orb round when combined with Garp, however he himself hits for far less. He also has the ability of having farmable units so bring him for sockets is another bonus. If either of these are not enough, you can play the riskier Rakuyo who will guarantee at least himself and the captain having PSY if your Garp special was unlucky.
- Usopp Impact: He is now farmable if you did not know - in Water Seven you can pick this character up now and he's highly recommended for Aokiji.
- Petty Officer Coby or Squard: Boost your PSY orbs for that 2+ million damage burst round. Doffy is clearly a better booster and has the ability to swap orbs too, his cooldown might not be ready for you in time. Coby is a descend substitute if you're not there yet.
- Senor Pink: Upgraded version of Coby as he has much better stats than Coby and if you could wait for his second stage special(1.75x orb booster) - Special: Stage 1 (13 default, 8 max): Changes own orb into PSY, amplifies the effect of orbs by 1.5x for 1 turn. Stage 2 (19 default, 14 max): Changes own orb into PSY, amplifies the effect of orbs by 1.75x for 1 turn
- Marco the Phoenix: Preferably maxed special as 19-22 turns is roughly where you'll need him if you want to heal after Aokiji's pheasant break. He's not required, but useful for those teams that are falling just short of beating Aokiji.
- Damage reduction characters are not required, but useful if it the one round you need to push closer to a burst round:
- Ghost Princess Perona or another damage mitigator if you want to tank Aokiji's.
- Nami Mirage Tempo or Nami Mirage Tempo: The Heavens can totally negate Aokiji's attack for one round.
- Swapping Units: You will need to play with your power team based on your specials and levels. The following units can help with stalling on earlier stages or can be added in for specials. It all depends on your cooldowns and pirate level if you have enough unit points to bring them as these teams can get expensive.
- Hawk Eyes Mihawk World's Strongest Swordsman: His special is why you bring him, used right before his burst round. He's best for Chain Multipliers like Rayleigh or Luffy as captain.
- Donquixote Doflamingo Warlord of the Sea: His double orb damage can't be beat. Use him for the burst round.
Recommended Sockets[]
You'll want level 2 anti-lock and level 1 anti-despair sockets for your team. While a lot of times these are nice-to-haves and you can Usopp GP your way out of things, these are absolute game changers for an Aokiji battle where EVERY turn matters! You can technically survive with just a level 1 anti-lock and no despair, but you'll need a plan for stage 3, such as Usopp GP.
Additionally, Rayleigh teams will not need anti-lock. His special can be used for your burst round after Aokiji's 5th turn. His high RCV makes taking a hit from early stages less significant as well, but still relies on a small amount of RCV luck.
As usual, matching orbs and cooldown reduction sockets help as well.
Recommended Teams[]
| Chain Multiplier Template | |||
|---|---|---|---|
| Captain | Subs | Friend | Ship |
| Requirements | |||
| |||
| Chain Multiplier: One Turn LL Kill Team | |||
|---|---|---|---|
| Captain | Subs | Friend | Ship |
| Requirements | |||
| |||
| Chain Multiplier: Rayleigh Burst | |||
|---|---|---|---|
| Captain | Subs | Friend | Ship |
| Requirements | |||
| |||
| Sengoku Impact Team | |||
|---|---|---|---|
| Captain | Subs | Friend | Ship |
| Requirements | |||
| |||
| Sengoku GPU Team | |||
|---|---|---|---|
| Captain | Subs | Friend | Ship |
| Requirements | |||
| |||
| PSY Power Team | |||
|---|---|---|---|
| Captain | Subs | Friend | Ship |
| Requirements | |||
| |||
| F2P Gild Tesoro 4x Beli | |||
|---|---|---|---|
| Captain | Subs | Friend | Ship |
| Requirements | |||
| |||
| F2P QCK Team | |||
|---|---|---|---|
| Captain | Subs | Friend | Ship |
| Requirements | |||
Mihawk under Croc, Kaku under Lucci.
| |||
| F2P Slasher Team | |||
|---|---|---|---|
| Captain | Subs | Friend | Ship |
| Requirements | |||
| |||
| Treasure Map Heavy Rainbow Team | |||
|---|---|---|---|
| Captain | Subs | Friend | Ship |
| [[File:|40px|link=Dreadnaught Sabre]] | |||
| Requirements | |||
| |||
How to beat 60 Stamina Clash!! Admiral Aokiji[]
Aokiji 60 Stamina Video Walkthroughs[]
")
")
")
")
Aokiji 60 Stamina Written Walkthroughs[]
The auto-targeting on this level is TERRIBLE! You will almost need to target each enemy in between attacks, so practice your timing and targeting as this level will be SUPER difficult and every move matters.
When a boss is immune, you should build your team around those with specials that impact you. So attack boost and Orb Boost characters are excellent support units. While it's recommended you keep 4 of your units PSY, you can bring along Orb Boost characters if you need extra push outside of the PSY family such as Donquixote Doflamingo Warlord of the Sea. However, make sure their cooldowns fit in the 19-22 range for you to be able to use them before Aokiji's sixth turn.
- Note: The team in this picture failed the burst round on Aokiji as it was too late before I realized I didn't have an orb booster. A second run with Koby instead of Rakuyo was successful as per recommended teams section.
| Stage | Strategy | Enemy Info | |||||||
|---|---|---|---|---|---|---|---|---|---|
| 1 | 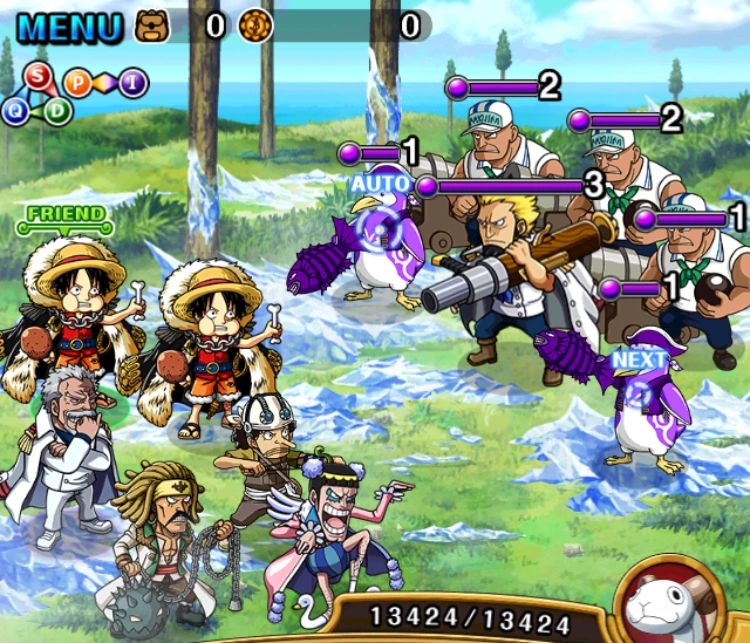
|
Grunts and 2 penguins Take out the grunts on the last possible turns. Try and take out the penguins slowly and use food to heal if you receive it. You should be able to get 3-6 turns out of this stage. For the F2P Slasher Team: You'll need to take no hits here but stall a minimum of 3 turns. For G3 Teams: You can take a hit from a penguin here to stall. For Double Garp Teams: Just stall where possible but don't take hits. The Garp approach is real chill as you'll be stalling on Aokiji. You'll want to manage your Marco cooldowns to be ready by the time you need him. With a 10 range, that's a lot of variables, so it's best to just stall as long as possible while taking minimal damage. Don't forget you'll lose all your health on Aokiji's third turn, so don't worry too much about taking hits. |
| ||||||
| 2 | 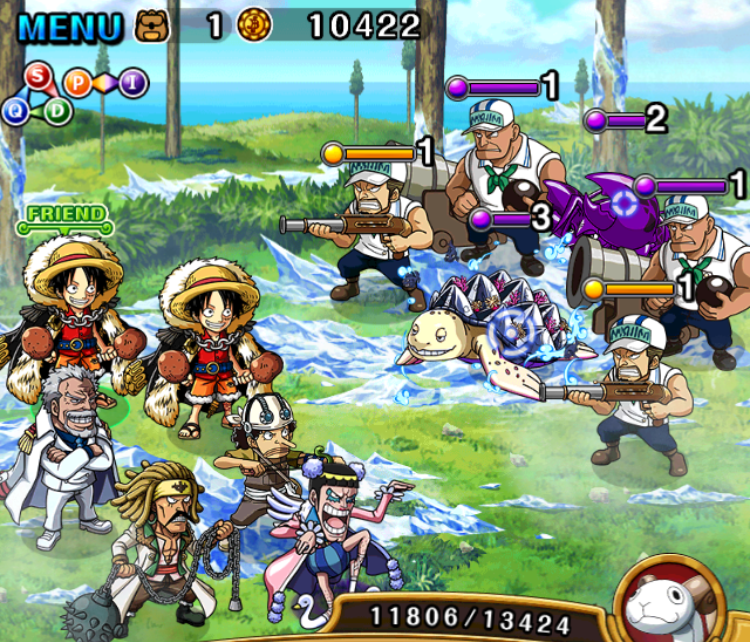
|
Grunts + Evolvers Stall and heal where possible on the evolvers. Take out the grunts and take no damage from them. You could get 6-10 rounds on this depending on your health and opening cooldown on the lobster. For F2P Slasher Team: You'll want to take exactly 5 turns here. The problem is the stupid turtle. He can be on a 1 to 3 hit cooldown. 3 you're in the clear. For 1 to 2 turns, you're going to want level one or two auto-heal in order to stay above the 19000 health mark so that you can tank the hit from the 3 huge marines. If you don't have enough health, you can try and take out a larger marine on the next stage but it's not guaranteed. For G3 Teams: Try and look for meat and stall on the evolvers. For Double Garp Teams: The lobster is a great unit to stall on. Otherwise push through. |
| ||||||
| 3 | 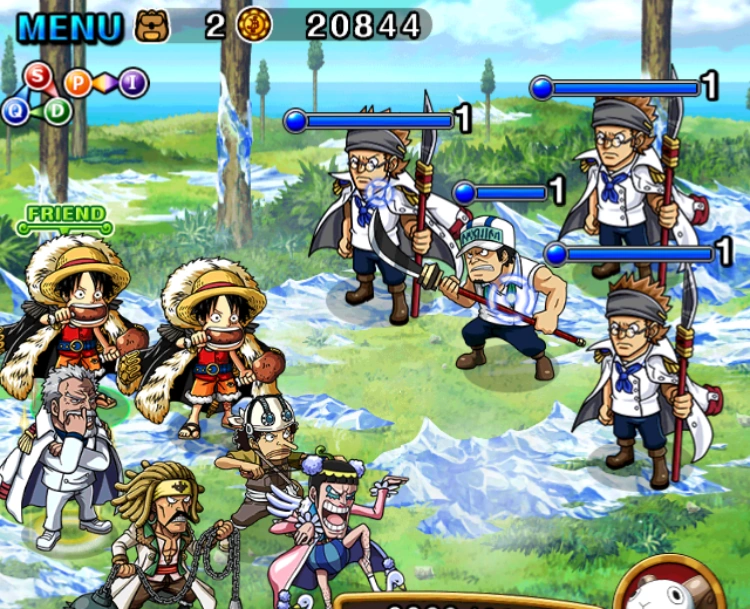
|
Marines Normally the stages leading up to a boss just weaken you, this is an exception where you can straight out die on this level if you miss your chain multiplier attacks. If you have a level 1 anti-despair, this level becomes significantly easier. For F2P Slasher Teams: If you don't have level 1 anti-despair, you'll need near 19,000 health to survive 3 attacks from big marines. You can save some health if you're able to take out the larger marine instead of the small one, but good luck! Otherwise, just take the units out. You'll want to make sure at least one Mihawk is ready in 5 turns upon leaving here, and the other will be ready in 8 turns! Don't worry about health past this stage, you won't need to take any more hits other than a straight 80% HP cut! For G3 Teams: Hopefully you have level 1 anti-despair. Try and take out 3 units and just brave the 6,100 hit. You'll want to look at your health and your specials here. Anything you want ready for round 3 with Aokiji must have 8 turns left of health before proceeding. For double Garp: Meh, just attack and move on. Nothing to worry about here other than making sure your Marco has 10 turns of special left in order to survive Aokiji. |
| ||||||
| 4 | 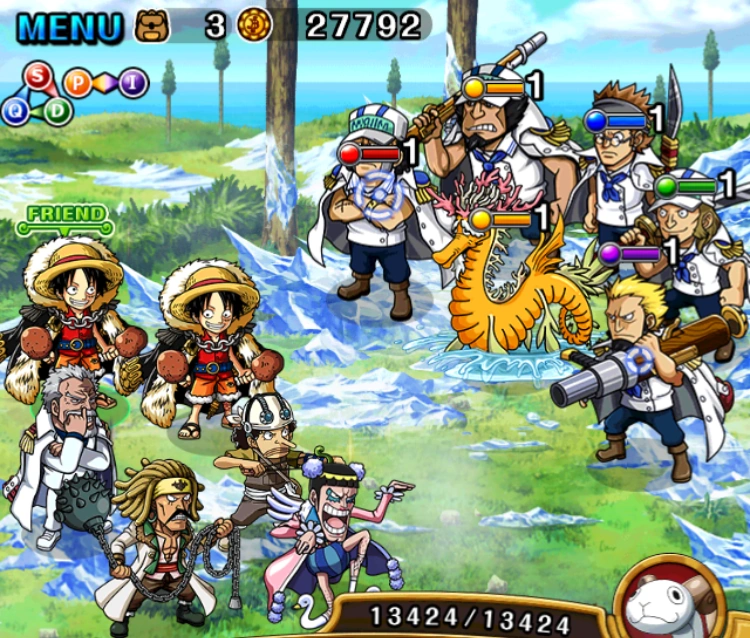
|
Sea Stallion + Marines As usual, focus on the Sea Stallion first. Let the units that lock units attack assuming you can still take them out in two rounds. This should buy you 3 rounds. For F2P Slasher Teams: Leave the QCK and INT unit up while taking out everyone else. Let them lock (assuming you have level 2 anti-lock sockets) and then take them out slowly. For G3 Teams: Leave the QCK and the STR unit up to lock. Take them out after 2 turns of stalling. For Double Garp Teams: Leave the INT unit up, and if you brought the Doffy variation you can leave the QCK unit up as well. After two rounds of stalling for no damage, push forward. |
| ||||||
| 5 | 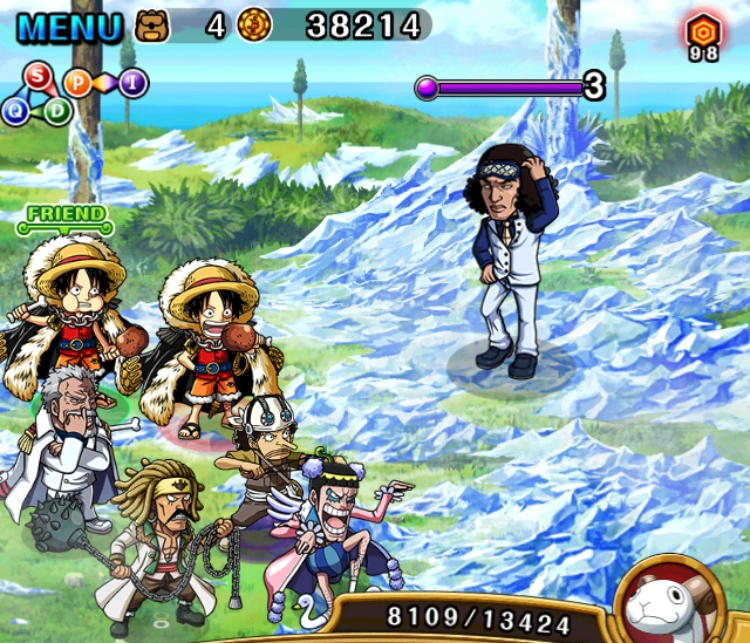
|
Aokiji Ice Man You will have 5 rounds of damage to do what you will. We'd recommend using just normal attacks, and saving for a burst round right above his 50% hp mark for turn 5. If you have a level 2 anti-lock, this helps with having a full squad of attacks. This is particularly imperative if you're using a chain multiplier captain like Luffy or Rayleigh. If you have multiple attack boosters that won't stack (Urouge and Impact Usopp), consider using one (the weaker one) during these rounds to get him closer to 50%. On turn 5, if you don't have enough health, you'll need to heal up to about 8,000hp to survive his attack. The good news is you'll have another 3 rounds to stall. Once he's above 50% health, activate your orbs, orb boosters, and attack boost and try and burst 2,000,000 damage in this round. If you fail, and he falls below 20%, it's lights out for you as he'll deal 100,000 in damage every turn. |
| ||||||
Team Builder Helper[]
PSY Characters who Boost Orbs
- Petty Officer Coby
- Squard
- Maelstrom Spider Squard
- Senor Pink Donquixote Pirates
- Senor Pink
- DeCalvan Brothers Whitebeard Pirates Family
- Usopp Straw Hat Pirates: Reunited
- Usopp Straw Hat Pirates: Born Again
- Franky Straw Hat Pirates: Born Again
- Franky Straw Hat Pirates: Reunited
- Sanji Celebrate 20th Anniversary Cruise
- Fujitora: Gravity Blade Navy HQ Powerhouse
- Fujitora Navy HQ Powerhouse
- Dogstorm Mokomo Dukedom
- Orlumbus Yonta Maria Fleet Commodore
- Orlumbus the Savage Surmounter Yonta Maria Fleet Commodore
- Dogstorm: King of the Day Mokomo Dukedom
- Vinsmoke Judge Science Military Germa 66
- Vinsmoke Judge
- Cavendish White Night
- Cavendish White Christmas Knight
- Boa Marigold Runaway Slave
- Nico Robin Healthy Beauty
- Nico Robin Symbol of Culture
- Monkey D. Luffy I Can't Eat Any More
- Monkey D. Luffy Gear Four: Tankman
- Sugar Dressrosa King's Family
- Sugar Donquixote Family's Key Figure
- Ikaros Much New Fish-Man Pirates
- Ikaros Much Fish-Man District Spirit
- Spartan
- Dracule Mihawk Marineford at War: Master Swordsman
- Dracule Mihawk Marineford in Chaos: Master Swordsman
- Sanji 20th Anniversary Memorial Treasure
- Portgas D. Ace Detested Bloodline
- Portgas D. Ace Beloved Son of a Demon
- Pound Father of Lola and Chiffon
- Pound
- Sengoku Navy HQ Admiral
- Buddha Sengoku Navy HQ Admiral
- Trebol The Heavenly Demon's Strategist
- Basil Hawkins Problematic Pirate Alliance
- Charlotte Opera Fifth Son of the Charlotte Family
- Charlotte Opera Minister of Cream
- Tsuru Watchful Great Advisor
- Sanji & Judge Destiny of Father and Son
- Sanji & Judge Parting of Father and Son
- Cavendish Beautiful Captain Gathering Popularity
- Cavendish Beautiful Captain Fulfilling the Demands of Fame
PSY Characters who Boost Attack
- Kami Eneru
- Eneru
- Usopp Impact
- Usopp Lying Wolf
- Urouge
- Mad Monk Urouge
- Sengoku the Buddha
- Sengoku
- Franky Voyage Log: Straw Hat Pirates
- Franky Voyage Dream: Ship of the Seven Seas
- Sabo
- Shanks Pirate Apprentice
- Shanks Roger Pirates
- Sabo Revolutionary Army
- Conis Skypiea Girl
- Conis
- Chopper Mask Defender of Peace
- Momonga Marine Vice Admiral
- Tony Tony Chopper Birdie Kingdom Peace Broker
- Kung Fu Dugong Sea Animal Pirates
- Angel in White Nami Wedding
- Goddess in White Nami Wedding
- Hajrudin Pirate Mercenary
- Lucky Roux Red-Hair Pirates
- Lucky Roux
- Usopp-un
- Dogstorm Mokomo Dukedom
- Fisher Tiger
- Fisher Tiger Sun Pirates Captain
- Jinbe Warrior Shark
- Dosun Deep-Sea Fish-Man
- Sabo Flame-Flame Fruit Wielder
- Dogstorm: King of the Day Mokomo Dukedom
- Usopp Straw Hat Pirates: Born Again
- Usopp Straw Hat Pirates: Reunited
- Trafalgar Law Boy Driven by Destiny
- Trafalgar Law Boy from Flevance
- Koala Undercover Revolutionary
- King Neptune, The Sea God King of the Ryugu Kingdom
- King Neptune, The Sea God
- General Franky
- General Franky Iron Pirate
- Cavendish White Night
- Cavendish White Christmas Knight
- Hajrudin
- Boa Marigold Runaway Slave
- Diamante: Neo Flapping Flag Man
- Diamante: Neo Top Donquixote Family Officer
- Ben Beckman Harbor Town Pirate
- Monkey D. Luffy I Can't Eat Any More
- Monkey D. Luffy Gear Four: Tankman
- Emporio Ivankov New Kama: A New Human
- Emporio Ivankov God of Queens
- Fancy Princess Perona Wedding
- Fukaboshi
- Vinsmoke Sanji Germa Kingdom's Sacrifice
- Vinsmoke Sanji Germa Kingdom's Savior
- Nami Let's Go to the Pirate Festival!
- Portgas D. Ace Detested Bloodline
- Portgas D. Ace Beloved Son of a Demon
- Charlotte Flampe
- Charlotte Flampe President of the Katakuri Fan Club and Kamikaze Captain
- Vinsmoke Reiju North Blue Cavalier
- Vinsmoke Reiju Poison Pink Cavalier
- Tsuru Watchful Great Advisor
- Sanji & Judge Destiny of Father and Son
- Sanji & Judge Parting of Father and Son
- Cavendish Beautiful Captain Gathering Popularity
- Cavendish Beautiful Captain Fulfilling the Demands of Fame